The Future Of Led Electrical Lighting Systems

The Only LED Lighting Guide You Will Ever Need

The world of technology is forever changing, and that goes without saying. Whether it’s a thermostat that you can program with your phone, a car that can park itself, or a light bulb that turns off when you’re not in the office; innovators are finding new and improved ways to help you save time and money.

As you may know, the world of lighting systems is changing as well, with the influx of LED technology. You may not have noticed, but LED lighting is incorporated in every part of your life. If you drive your car to work every morning, wait at a traffic light, use your smart phone, go to the doctor’s office, or use your laptop at work; you are more influenced by LED’s than you thought.

I am sure you have seen LED lights in modern appliances, street lights, and commercial signs, but have you ever wondered exactly how they work? If you plan on making improvements or renovations to your building space, we have created this LED guide to help you make an educated buying decision. We have broken down an LED light bulb into three components: Optical, Electrical, and Thermal.

LED Light Bulbs: Do LEDs Generate Heat?

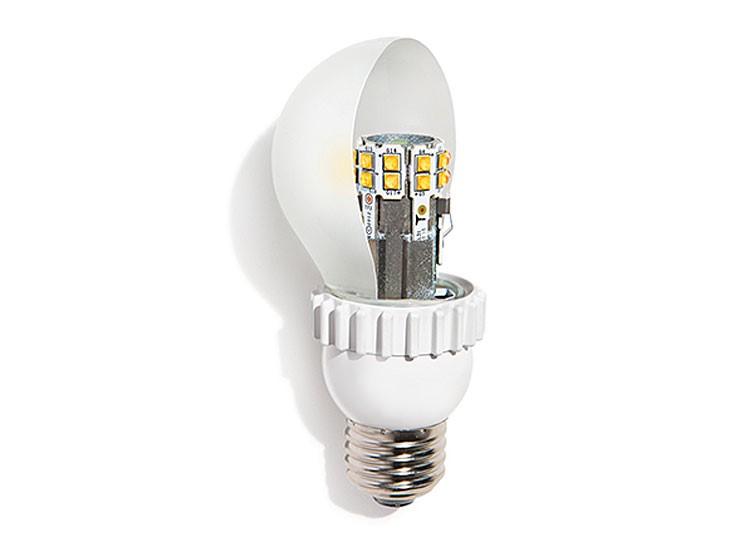
Unlike traditional lightbulbs, that tend to emit large amounts of heat, LEDs have thermal components that not only make them more energy-efficient, but safer as well. When a light bulb is electrically charged, it generally emits a certain amount of heat. Traditional bulbs tend to emit a higher amount of heat than the average LED light bulb. Innovators of LED technology understand this occurrence, and have come up with a solution to high heat emissions. They are called fins

What are Fins?

Fins are basically the outer shell of the LED lightbulb that allows for heat to be dispersed from the bulb. Incandescent lightbulbs don’t have this feature, therefore causing most of the heat that is generated to remain inside the lightbulb. Not only do LED lightbulbs generate less heat than traditional lightbulbs, they use less power as well.

Did you know that…

Any product when electrically charged, will generate a certain amount of heat. However, innovators of LED technology have incorporated heat dispersion techniques to reduce those heat emissions. They are called fins.

What are Fins?

Fins are an outer shell, usually made of aluminum or ceramic, that allow for heat dispersion. Manufacturers often use a high number of thin fins to address the need for heat dispersion.

How much heat is generated?

Did you know that about 90% of the energy from incandescent lights bulbs is wasted as heat. Not only does LED light bulbs generate less heat, but they use less power to do so.

LED lighting – constraints and recommendations

In order to understand the impact that LED technologies will have on existing electrical networks, it is important to analyze the behavior of all key elements in the network. Below is a list of potential risks to consider and also some recommendations for mitigating those risks

The risk related to circuit breaker selection

The choice of circuit-breaker characteristics depends on the nature of the load powered. The rating depends on the cross section of the cables to be protected and the curves are chosen according to the loads’ inrush current. When switching on LED luminaires, very significant inrush currents occur up to 250 times the nominal current according the type of driver for a very short time (< 1 msec).

Normative curves according to the “standard” (curves as defined in NF EN 60898 and NF EN 60947-2) used for circuit-breaker certifications (which characterize fault currents of a duration exceeding 10 ms) give the circuit breakers’ tripping threshold for currents maintained for 10 ms or more. For transient currents of duration less than 10 ms, no normalized curve exists. The peak value of the total current at switching on depends on the energizing time, the number of luminaires forming the lighting circuit, and the short-circuit power and architecture of the network.

Recommendations

In order to address this risk an appropriate choice of the circuit breaker (rating, curve) must be done during the design phase of installation, according to the recommendations given by the manufacturer. Another option, very useful in the case of replacing conventional lighting by LED lighting on existing large installation, is to implement a remote control including zero crossing function in place of standard device. That will limit the total inrush current in the order of 4 to 5.

The risk relating to Earth leakage protection device

The leakage current is at maximum for switching on at the voltage peak. The frequency of this transient current is high (about 100 kHz). For switching on at zero voltage, the leakage current is practically zero.

What are LED Light Bulbs?

In addition to their electrical and thermal properties, LED’s also have optical components that make them significantly different than traditional lighting. In terms of performance, LED lights are considered the superior form of lighting based on these four major indicators

Brightness & Efficiency

This is directly related to the amount of light LED’s emit. The amount of light they emit is dependent on the wattage, or power, they require to function.

Color Temperature

LED’s have three different color temperatures. Warm White, Daylight White, and Natural White or Cool White.

Lifespan

You can use the same LED light bulb for up to 50,000 hours. That is equivalent to 30 years, if used regularly, like at home. Commercial usage can average about 20,000 hours, which is still a very large margin to its fluorescent counterpart.

Light Distribution  ​

LED’s are omni-directional, which means that their light output has a wider beam angle. This function makes LED light bulbs far more efficient than traditional bulbs.

LED LIGHTING

A SMALL CHANGE THAT ADDS UP TO A BIG DIFFERENCE

LED light bulbs use up to 85% less electricity than traditional incandescent or halogen bulbs and can last 15 times longer. They cost more upfront – but the long-term savings are worth it.

Wide range of looks and styles

Most bulbs cost less than $10, some just $3 or less

Can save $100-$300 in running costs over the life of the bulb

Good quality lighting

Instant brightness

THERE’S AN LED FOR EVERY ROOM IN THE HOUSE

LEDs come in different types including standard light bulbs, spotlights, candles and recessed downlights. You can choose dimmable or non-dimmable bulbs. Some can change their light colour or brightness even without a dimmer switch.

BASE

For standard bulbs, check if you need a bayonet or screw fitting. To replace halogen spotlights, check if you need a low-voltage (12 V) MR16 (also called GU5.3) bulb with two sharp pins, or a mains-voltage (240 V) GU10 bulb with two studs.

BRIGHTNESS

LED packaging shows light output in lumens, usually with the equivalent wattage of an incandescent bulb. Chances are the LED will actually appear brighter.

COLOUR

Warm white is more comfortable in homes. Cool white works best where contrast is important, such as workshops and garages.

POINTS TO WATCH

LEDs shouldn’t be used in enclosed fixtures where the bulb is fully encased in plastic or glass, such as some porch lights. LEDs need good ventilation for a long life – if they get too hot, they may fail.

For recessed downlights, it’s best to replace the whole fitting rather than just the bulb.

Hold onto your receipt. With LEDs costing a bit more to buy, keep your receipts in case you happen to buy a dud.

Don’t Underestimate Ceiling Fans Installation Impact

Tools Needed to Hang a Ceiling Fan

New ceiling fans come with instructions explaining how to install them yourself. Doing so requires standard tools you probably already have around the house. Reading the instructions ahead of time allows you to mentally walk through the installation process ahead of time, comparing illustrations in the manual to their respective parts on the fan and preparing tools for the job. A friend is also a great asset during the installation process, as a fan can be quite heavy and difficult to hold up as you secure it to the ceiling.

Screwdrivers or Driver Bits

One of the most important tools is also the most basic: a screwdriver. If the fan arrived unassembled, a screwdriver may be needed to attach the blades to the blade housing on the motor assembly. It’s also used to attach the fan’s ceiling plate to the support mechanism in place on the ceiling. A fan’s weight requires more support than a standard light fixture, so if adding a support or junction box rated for ceiling fans, you’ll need a screwdriver

Drill

A power drill is used to drill pilot holes and driving screws to mount a new ceiling junction box to ceiling joists or for installing and mounting to blocking between the joists. Fitted with a screwdriver bit, a drill allows for speedy attachment of the fan motor hardware to the ceiling, reducing the amount of time and strain that would be experienced if using a standard manual screwdriver. A cordless power drill offers freedom from a cord getting in your way during fan installation

Wrench

The down-rod pipe, a pipe that protects and houses electrical wires coming out of the fan, requires a wrench to tighten the locking screw which holds the pipe in place within the fan assembly. An adjustable wrench tightens this, as well as smaller nuts that may be part of your fan assembly; specific sizes, screws and nuts vary by manufacturer

Electrical Tools and Supplies

Wire strippers allow you to both trim wires to size and strip the plastic coating off wire ends, exposing them to create electrical connections. Wire strippers may be needed on both existing wires within the ceiling, as well as the wires protruding from the fan motor assembly. Electrical tape and wire connectors secure fan wires to house wiring. An electrical tester allows you to test wires within the ceiling after shutting off power to the area, ensuring that power really is off before doing the electrical portion of this project.

How to Install a Ceiling Fan With a Handheld or Wall Remote

Many new ceiling fans come equipped with remote control, especially higher-priced ceiling fans. The receiver part of the remote is nestled inside the fan body itself, while the control mounts either on the wall or into the wall as a switch. If you’ve been thinking about replacing your existing ceiling fans, it is relatively easy to do this project yourself. If you can change an electrical receptacle, you can install a ceiling fan. Here are more details for this DIY home improvement project.

Before You Buy a Ceiling Fan

Ceiling fans can improve home energy efficiency and provide a decorative upgrade. However, don’t run out to buy the first cute ceiling fan you see.

Ceiling Height

Ceiling heights below 9 feet might require a fan that hugs the ceiling, known as a flush mount. Find out the distance between the ceiling and the bottom of the fan, referred to as the hanging depth. Allow at least 7 feet from the bottom of the fan to the floor to avoid getting hit when walking under spinning blades.

Blade Sweep

Experts say the number of blades isn’t as important as the size of the motor and the length of the blades. Larger motors cost more than smaller motors. Blades that measure 52 inches work better in rooms that are greater than 15 feet in length, whereas 44-inch blades are made for smaller rooms. If you are replacing a smaller fan with a larger fan, make sure the blades will not hit another object in the room, such as a door. Allow a minimum of 18 inches from the tip of the blade to the wall

Lighting Options

If you choose a light fixture requiring a fluorescent lamp, it is unlikely to be compatible with a dimmer switch, and you may need to replace your light switch beforehand. Consider whether you want the light to flood the room or to illuminate the ceiling.

Can I Install Ceiling Fans In Every Room?

Ceiling fans can improve your comfort during hot or cool weather by lowering the perceived temperature and helping your HVAC system to circulate heated or cooled air more efficiently. If your home doesn’t currently have ceiling fans installed, this is a simple electrical upgrade that your electrician

Ceiling Fan Installation

Ceiling fans can be installed in any room in your home, such as living rooms, dining areas, offices, and bedrooms. These fixtures make a great addition to rooms in which you spend a significant amount of time, as they can augment your home’s heating and cooling system all year round for improved comfort and energy savings. Ceiling fans can even be installed in outdoor living spaces, such as covered patios, porches, and pergolas. Ceiling fan installation is a task that should always be handled by a professional electrician, as it requires changes to the electrical wiring and, in some cases, the addition of a wall switch or breaker circuit. If your home’s electrical system is outdated, you may want to consider a panel box upgrade at the same time to handle the increased electrical usage. Your residential electrician will let you know the process involved in ceiling fan installation for your home, based on the number of fans you wish to install and where you would like them placed.

Ceiling Fan Considerations

If you do choose to install ceiling fans in one or more rooms in your home, there are a few considerations you should take into account. First, you’ll need to choose a ceiling fan with the appropriate size for the room in which it will be placed. The diameter of a fan affects its air circulation capacity, so you’ll need a larger fan to achieve the comfort levels you want in a larger room. Additionally, you’ll want to consider the aesthetics of the fan—it’s best to choose a ceiling fan that meshes with your home’s style and décor to create a seamless transition between your home and your new fixture. Finally, consider whether you want a ceiling fan with additional features, such as a light fixture, wireless control, or a high-efficiency electrical motor.

Frequently Asked Questions about Ceiling Fans

There are a few types of wired controls with no receivers. The most common are Single/Dual Slide Controls, or Rotary Knob Controls.

A Single Slide control will control ONLY the fan speeds, and requires a two-wire setup (One Hot – Positive, and One Negative/Neutral). The same as an on / off switch.

A Dual Slide control will control the fan speeds and light, and requires a three-wire setup (Two Hot – Positives, and One Negative/Neutral).

Most Wall Controls with Receivers are wired. Wired wall controls require a two-wire setup and speak with the Receiver via Dip Switches. Dip Switches are tiny little switches (typically 4-8 switches with on/off abilities) within the Wall Control and often on the Receiver (unless the Receiver is a Learn-Receiver, where the Wall Control must be programmed or ‘burned’ into the receiver to speak with each other). The Dip Switches on the Receiver and the Wall Control must match each other in order for the fan to function. Wireless wall controls work in the exact same fashion, but require a tiny battery to operate. (Typically a 12 Volt A23 Battery, commonly found in local stores / hardware stores.)

Most Remote Controls with Receivers speak via Dip Switches. Dip Switches are tiny little switches (typically 4-8 switches with on/off abilities) within the Remote Control and often on the Receiver (unless the Receiver is a Learn-Receiver, where the Remote Control must be programmed or ‘burned’ into the receiver to speak with each other). The Dip Switches on the Receiver and the Remote Control must match each other in order for the fan to function. Most remotes require a tiny battery to operate. (Typically a 12 Volt A23 Battery, 9 Volt Battery, or Two / Four AAA Batteries. Commonly found in local stores / hardware stores.)

Most controls that speak to receivers function via Dip Switches (explained previously). Though, on the other hand, some Receivers are learn-receivers and require a specific command from the Remote / Wall Control to function. Every manufacturer has a different set of commands required for the receiver to listen.

Controls in conjuction with CFL Bulbs.

Most controls come with a dimming function capability. While most light fixtures are transitioning or come with CFL (Compact Fluorescent Bulbs) these however do not having the dimming function capability and in conjunction with the controls that do may not work properly or have a slight hum noise, to the extent of burning out the receiver / computer board

Things to Consider When Buying a Wall Mounted Fan

If floor space is an issue, you may find that a wall mounted fan works best for your situation. Wall mounted fans are increasingly becoming more popular, as they are frequently found in homes, home gyms, garages, greenhouses, and outdoor patios.

While not all wall mounted fans are created equal, the assortment of brands on the market allows you to make the best decision and select a fan brand that is suitable to the environment where it will be used.

How Do Wall Mount Fans Differ from Ceiling Fans?

Ceiling and wall mounted fans both provide plentiful circulated ambient air throughout any environment, keeping you comfortable in summer and winter. While both provide adequate air flow, they vary in their operation.

Ceiling Fans

Ceiling fans provide comfort in the summer, as the fan circulates air throughout the living space. During the winter, ceiling fans can pull and circulate warm air trapped at the ceiling by setting them to circulate in the clockwise position. This will help to redistribute warm air throughout the living space.

Wall Mount Fans

Wall mounted fans tend to work in a different fashion. While fans circulate air, the wall mounted fans push air horizontally throughout the space and not down like ceiling fans. Depending on size and placement, the air circulated may not always be felt at a distance, and they cannot circulate warm air trapped at the ceiling.